
Accordion Design

/* accordion design */

.uk-accordion-content{
margin-left: 20px;
margin-bottom: 20px;
}
.uk-accordion {
margin-top: 40px;
background-color: #fff;
}
.uk-accordion-title::before {
background-image: url("/images/graphics/accordion-graphics/shield-20.png");
background-repeat: no-repeat
}
.uk-open > .uk-accordion-title::before {
background-image: url("/images/graphics/accordion-graphics/shield-20-red.png");
}
.uk-accordion > :nth-child(n+2) {
margin-top: 0;
padding-top: 0;
}
.uk-accordion-title {
background-color :#f7f7f6;
padding: 20px;
}
.uk-open > .uk-accordion-title {
background-color: #999;
}

.uk-accordion-content>:last-child {
margin-bottom: 20px;
}
/* END accordion design */


Biomin redesign.

/* accordion radius corved corners and uppercase*/
.uk-accordion-title {
border-radius: 5px;
text-transform: uppercase;
font-size: 14px;
}

/*accordion making the text stay in the middle of the button vertically*/
.el-title {
display: flex;
align-items: center;
width: 160px}
}

/*center accordion */

.el-title {
margin:0 auto;
}

  • Hits: 17

Set up JFilters in Yootheme Pro

Make sure the JFilters, YoothemePro plugin is loaded and enabled.

Make sure Ajax Interfce is turned off.

In the Joomla menu make a menu item JFilter Reshils and select JFilter /  Results from the Menu itme type - save.

In YoothemePro go to the new JFilter menu item page.

Create a Template, call it JFilters Results. Choose Page / JFilters Results

 template

Save the template it will have a dot beside it if you are on the JFilter page, click on the templte to open the builder / template 

Click New Layout.

Split the section into 2 columns

columns

Add a grid into the the second column

Click on the grid and add an item

Inside the item you have just created to to the advanced tab and from the Dynamic Content drop-down, select JFilters Results Items.

advanced

 Still inside the item go to the Content tab and map the title

title

Contine to map the items on this page.

Limit the amount of full content showing, by setting the content length. Click on the edit icon.

 content


  • Hits: 17

Drop Down Sub Menu Dividers - Framerate style

YOOtheme > SETTINGS > Custom Code


/* add in the dividers in the dropdown sub menu */
.tm-header .uk-navbar-dropdown li + li::before {
content: "";
display: block;
height: 1px;
width: 100%;
background: #739ed1;
}

  • Hits: 15

Ukrainian Flag Open Street Map Leaflet

To remove the Ukrainian flag and leaflet section altogether, add:

/* remove the Ukrainian flag on the map */
.leaflet-control-attribution a {
    display: none!important;
}


  • Hits: 5

WhatsApp Chat Widget

If you use Joomla, please carefully take the following steps:

In your Joomla backend select System > Global Configuration > Site > Default Editor: Editor - None, and click on "Save & Close" in the toolbar.

This is important because most WYSIWYG editors (unrelated to YOOtheme) would "cleanse" the HTML markup when you save and simply delete a div element without content — like the one you are going to add. Once the widget is up and running, select the original editor, of course, and save.

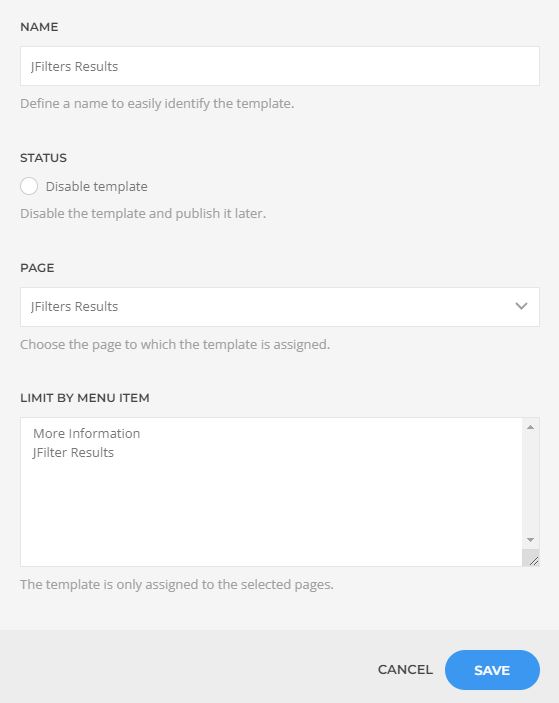
Head over to Joomla Admin Menu > Content > Site Modules, create a new module of the type "Custom". Into the field "Title" enter the "WhatsAPP Widget", select Title: Hide, into the field "Position" type the precise string

  debug

and confirm the entry with the return key.

Into the content field of the module enter the following

  <div id="msgboxxWidget" class="widget"></div>

Mind: The closing is officially not supposed to be added, but I strongly recommend it. If you want to see the result without it, feel free to leave it out.

Make sure the module is set to Status: Published and Menu Assignment > Module Assignment: On all pages, and click on "Save & Close" in the toolbar.

Navigate to YOOtheme > SETTINGS > Custom Code > SCRIPT, and insert precisely the following at the very beginning of the field

  <script src="https://cdn.msgboxx.io/static/js/bundle.min.js" async onload="window.msgboxxClient='YOURID ';"></script>
  <link href="https://cdn.msgboxx.io/static/css/bundle.min.css" rel="stylesheet">

(With your ID instead of YOURID, of course ...)

Important in case the field is not empty and already contains any JavaScript content: If the existing script content in not wrapped in tags add a tag at the very end.

Save the changes.

Reload the page to test the result.


For posterity: From what I could see, they used

<div id="msgboxxWidget" class="widget"></div>

on their site.

This might seem a subtle difference, or even be considered as nitpicking or acting clever on my part, but I couldn't care less. Strictly speaking, this is not about a YOOtheme product. The support of "stitch-ai.com" is apparently not in the habit of providing assistance, so I just wanted to make sure you don't end up with a broken site if you use their product. Thank you

  • Hits: 5

Meta text

Style / text / Meta

  • Hits: 4

Menu item not showing

Edit this menu item and either change the menu item type to System Links: Separator (recommended) or click on its tab "Link Type", and into the field labeled "Link Class" insert the string

collections
  • Hits: 4