Change Turn text color colour to white
into Advanced / Classes - add
uk-light
- Hits: 3
into Advanced / Classes - add
uk-light
Gallery
Settings > Link > Type to Item for the gallery element,
you can already choose two hover effects at
Settings > Image > Transition: Scale Up and Scale Down.
Additionally, you can customize the overlay color in the Style settings of YOOtheme Pro.
CSS for grid
.el-image {
transition: filter 0.3s ease;
}
.el-image:hover {
filter: grayscale(100%);
}
/*
.el-image {
transition: filter 0.3s ease;
filter: grayscale(100%);
}
.el-image:hover {
filter: grayscale(0%);
}
*/
/*Grid Remove Title Top Margin */
.uk-inline-clip {
margin: 20px;
}
Settings / CSS
/* Overlay text area full width */
.uk-inline-clip,
.uk-inline-clip > [class*="uk-position-"] {
width: 100%;
}
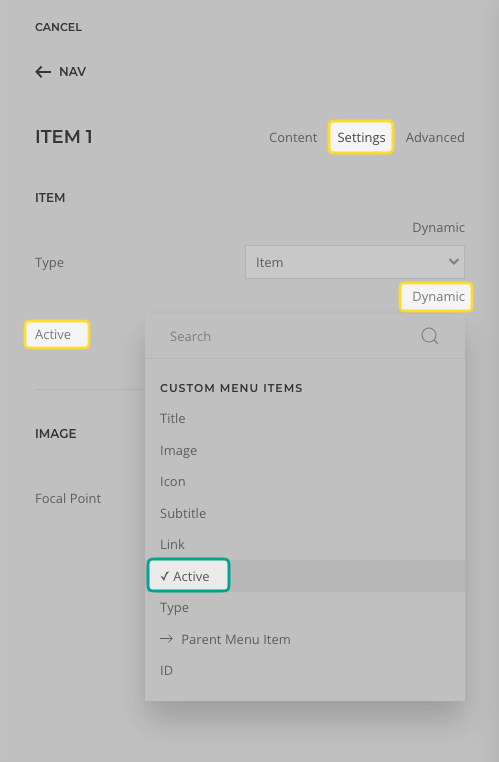
From what I can see in the source, your "active" menu items do not yet get the required class uk-active, so the "Active Color" styling will not be applied.
Edit the Dynamic Content item, and select Settings > ITEM > Active > Dynamic > Custom Menu Item/s: Active. This would apply the class to the "active" menu item — and subsequently style it accordingly.

.tm-header .uk-sticky .uk-navbar-nav > li.uk-parent > a {
position: relative;
z-index: 1021
}
.tm-header .uk-navbar-dropdown {
padding-left: 0;
padding-right: 0;
}
.tm-header .uk-navbar-dropdown-nav > li {
max-width: 190px;
display: flex;
justify-content: center;
}
Navigate to YOOtheme > SETTINGS > Custom Code > CSS/LESS, and add the following to it:
.uk-drop.uk-navbar-dropdown {
background: transparent url(../../../images/submenubackground.png) no-repeat;
background-size: contain;
top: 0px !important;
padding-top: @navbar-nav-item-height;
/* optional, depending on the style */
border: none;
box-shadow: none;
}
To adjust a possibly suitable shift to the lef — depending on the concept and the subject of the actually used background image — use the parameter YOOtheme > STYLE > Components > Navbar > Dropdown > @M Shift Margin, and set it to -80px, for example.
Layout / Header / Dropdown - change to center to line the image up in the centre of the main menu item, then...
play with the width of the dropdown in styles / navbar to get the image to centre.
Settings > General > Text Alignment: Right.
Then, edit the element, click on its tab "Advanced", scroll down to the field labeled "CSS", and insert the following:
.el-element li {
display: flex;
justify-content: flex-end;
}
Navigate to YOOtheme > SETTINGS > Custom Code > CSS/LESS, and add the following to it:
@media (min-width: @theme-page-container-width) {
.tm-page-container .tm-page {
max-width: none;
background: @theme-page-container-background;
}
}
@media (min-width: @theme-page-container-width) {
.tm-page-container .tm-page > main,
.tm-page-container .tm-page > header {
max-width: @theme-page-container-width;
margin-left: auto;
margin-right: auto;
}
}
Style / Utility / logo / color